Showing posts with label Food. Show all posts

Wednesday, November 09, 2011

Autumn - Otoño

Fall is really my favorite season. The smells and the feelings, more than the sights and sounds, evoke memories from my childhood -- freshly turned soil, burning leaves, chilly morning air, heavy fog. In Oregon, I savored the turning leaves in red, orange and yellow. Here in Sinaloa, fall brings the vibrant rainbow colors of bougainvillea and the bright green of corn, milo and wheat fields. Autumn in Oregon brought mornings of dense fog which sometimes didn't burn off till midday. Foggy mornings are part of autumn here, too.

Long-sleeved shirt, warm socks, hot coffee.

I do love autumn.

Here are some "Autumn in Sinaloa" photos. Enjoy!
Maria nibbles grapes at our friends' house in Tamazula.

My $1 pumpkin -- found at Wal-Mart. Pumpkins sell here before Halloween for about $2 per pound. I got mine for $.10 per kilo. Goooooooooooal! I see pumpkin swirled cheesecake in the near future.


Ramon arrives to deliver milk in the morning.

Making fresh butter.

Freshly baked apple coffee cake -- made, with love, by Seth.

Feliz otoño a todos!
Happy autumn, everyone!

Friday, November 04, 2011

Time Flies Like an Arrow...

...Fruit flies like a banana.

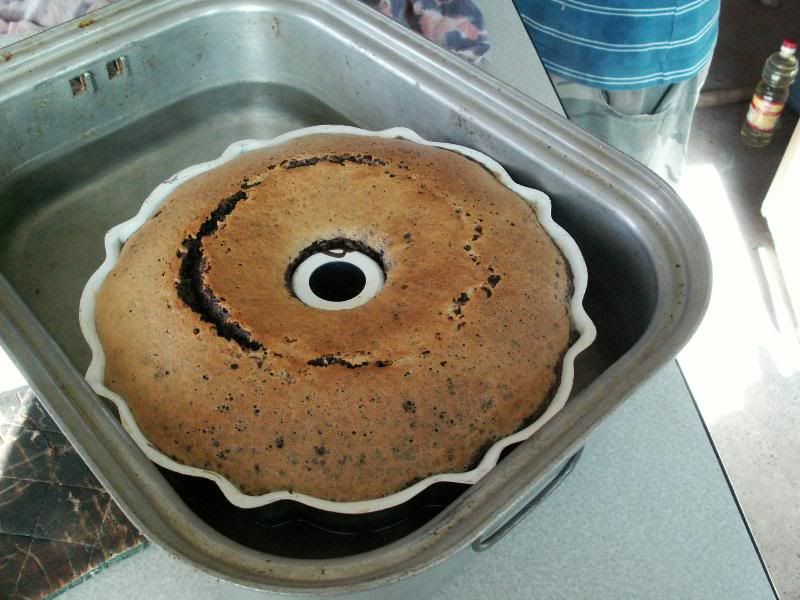
Today marks 4 years of banging my head against a wall blogging. To celebrate, I baked a cake!

In years past, I've hosted a "Round TUIT round-up" to commemorate my blogoversary, but this year...I didn't get around to it. Such is life on the beach!

We've been building a fellowship center, going on mission trips, planning a Bible school and getting ready for mission teams -- in addition to schoolwork, housework and laundry. A cake seemed much more accessible than a blog carnival!

I used the basic recipe for THE Chocoflan and crossed it with an amazing Crimson and Cream cake I saw somewhere -- memory fails. I had something in mind when I started this project.

I must say, this wasn't it.From the very moment that the pristine, white cream cheese mixture touched the creamy red cake mixture, I knew I had a problem. Note to self : Red food coloring is very invasive!!!

The kids' #1 comment: "Wow. That's red." #2: "Mom, why is it red?" #3: "Is it supposed to be that red."

It's a Red Velvet cake. Yes, it's supposed to be red.

So, I wiped ideas of "Crimson and Cream" from my mind and replaced them with thoughts of "Burgundy and Rose".

Everything baked according to plan.

But when it came out of the oven, I got ahead of myself.
I was a bit over-anxious when lifting the pan off the top and...sigh. Some days are cake-baking days. Some days are just NOT.

You can tell by the photo, though, that the top of the cake wasn't wasted. In the time it took me to grab my camera and shoot a couple of rounds, the mistake was eaten. Verdict: Red is good.

I put the cake in the fridge to chill for 24 hours.

Now here we are, all chilled and ready to turn onto the very-beautiful-cake-stand.
And here we are...

Happy blog-o-versary to me! Whipped cream covers a multitude of faults!!!

Thursday, October 27, 2011

THE Chocoflan

First of all, I want to go on the record as saying that I really don't care for flan. At all. It's kind of like watermelon for me. I'll eat it when it's put in front of me and I've been known to say, "Oh, this is a really good watermelon!" Left unsaid, however, is the rest of the sentence, "For a watermelon." That's how I am with flan.

Normally.

So, when my friend Melita said that she wanted to learn how to make a Chocoflan, I agreed to search out a recipe. But I wasn't all that excited.

Until I found this recipe at Kraftrecipes.com. You can click over and see why I was intrigued. I'll wait here.

Anyway, I printed out this recipe and began the translation into Mexican. I say "Mexican", since it's more than the words that need to change in most cases. Of course the measurements would need to change to metric, but although cajeta is easy enough to get here, Cool Whip? No lo hay!

The more I looked over this recipe, the more I just HAD to try it. So last week, for my friend Basilia's birthday, I tried this amazing-looking Chocoflan. (And I made a lemon cake, too, just in case the chocoflan flopped! lol)

I would say that it was a total and complete success! To be honest, I was a bit concerned when I opened the oven door after the first hour. It looked pretty strange and it didn't look like it had done what it was supposed to do, but upon closer inspection -- it was perfect. Sigh.
And tasty. I repent: I do like flan -- as long as it's made more like a cheesecake and has plenty of chocolate! Who wouldn't like this???

You can get this recipe over at the Kraft link above. I found it a bit convoluted trying to follow the recipe, though, so here's how I would write it:

What you'll need:
1 can cajeta (make your own by boiling a can of sweetened condensed milk for about 30 minutes -- in the can. Just take off the label, put the can in a pan of water and bring it to a boil. Weird, but it works.) You could also use any thick caramel sauce; you won't need very much.
1 can evaporated milk
1 8oz. pkg. cream cheese, softened
7 large eggs
1 tsp. vanilla
3/4 c sugar (the recipe calls for 1 cup -- I put in 3/4 and it was plenty sweet)
1 chocolate cake mix
1 c water
1/3 c cooking oil
(I omitted the sour cream and the Cool Whip as unnecessary. You could garnish with whipped cream, but it really didn't need it!)

For baking you'll need: a 12 cup mold/Bundt pan and a large "turkey roaster" or other pan large enough to hold the cake pan.

Preheat oven to 375 degrees.

Well-grease a 12 cup mold (I used a Bundt pan).
Pour up to 1/2 cup of caramel sauce into bottom of pan. (I barely used 1/4 cup and that was really plenty.)

In a blender, combine:
1 can evap. milk
1 pkg. cream cheese
4 eggs
vanilla
3/4 cup sugar

Set aside.

In mixer bowl, beat together:
Chocolate cake mix
1 cup water
1/3 cup oil
3 eggs

  • Pour chocolate cake batter gently and evenly into the cake mold.
  • Slowly ladle the milk and egg mixture over the top of the cake batter. (This was the crazy part. I thought that the recipe was mixed up, but it really does work!)
  • Gently set the cake mold into the turkey roaster, and fill the roaster with water enough to cover the bottom 1/2 of the cake mold.
  • Cover cake mold with aluminum foil (I missed this step, and the cake ended up a bit browned on the top -- didn't affect the taste at all, though!)
  • Place the roaster pan in the hot oven and bake for 90 minutes. (Until a toothpick inserted near the center comes out clean.)
  • Remove from oven and cool IN THE CAKE MOLD sitting on a wire rack until mold is only warm to the touch. Then REFRIGERATE until completely chilled! If you try to unmold this cake while warm, you'll be eating it with a spoon.
  • After cake is completely chilled, loosen edges gently with a plastic spatula, invert a plate (preferably the plate you'll be serving it on) over the top of the cake mold, and then flip the cake carefully over onto the serving platter.
Provecho!!!


Sunday, May 29, 2011

The Gap Theory of Blogging

Well, I'm seeing a bit of a pattern in my blogging over the past 5 years: I go "gangbusters", blogging every day or at least several times a week and then fizzle and have a big gap of a month or two with little-to-nothing posted. All I can say is, at least I'm consistent!!!

So, with no fanfare or lame attempts at trying to fill in the gap -- which would be impossible at this point: I live my life too quickly to try to catch up 3 or 4 months of blogging while trying to stay current -- I'm picking up where I am now, and we'll just pretend that the past few months didn't really happen...

...after all, they're just a blur anyway!

Highlights...
March

Our furlough in the States: Arizona, California, Oregon, Washington, Oregon, California, Arizona and Home. All summed up in 3 photos...

Our Family: Cold in Seattle


Saying Goodbye to Sarah in Oregon

April

Semana santa -- Holy Week -- the boys spent the week baking and selling breads, rolls and muffins.


They earned enough during the weekend to pay for their mission trip which is planned for mid-July. We'll talk more about that later!


May


Kids' Day!!!

Youth Retreat in Los Mochis

Lunch with friends.


Clam Season!!!


Finally getting around to gardening. WaHOOO!!!

Now I just pray that my internet keeps working!!! Man-o-man, have we been struggling for the past 3 months!!! Suffice to say that Telcel is NOT my favorite internet company, but since we have a one-year contract with them, I'll try to not grumble too much. I'm getting pretty comfortable calling the customer service center, though! I managed to be "firm but polite" last time I called, and we haven't been disconnected since. Hurrah!

I'll be back soon, Lord willing!

Saturday, November 27, 2010

Baking Soda Biscuits...hmmmm

I make biscuits frequently -- probably twice or three times a week. When I get up too late to do a yeast bread or don't have the two dozen eggs necessary to do an "eggy breakfast" for my plebes, we have biscuits.

I should be a pro.

Uh-huh.

So, this morning I didn't get up till 7 -- lazy bum, I know. What's for breakfast? Hmm. We had a couple of kids sleep over, and I thought it'd be a nice treat for them to have biscuits with peanut butter and jam. Sounds yummy, eh?

I didn't check to make sure I had baking powder before I mixed all the other ingredients up.

Well, I'd been wanting to try an experiment using only baking soda in place of baking powder. Baking powder here is a little spendy, and I can't find any that doesn't contain aluminum sulfate. Today would be my Day of Experimental Biscuits. I figured I'd add a little vinegar to the mix so that the baking soda would poof. They did poof nicely. Actually they were quite pretty.

The first bite told me that they had turned out passable.

Halfway through the second bite, I changed my mind.

I won't say that the experiment was a total flop. The ducks are very happy. I guess they don't mind the incredibly acrid, bitter, salty taste these beautiful works of art leave in your mouth for about an hour.

My oldest son said they weren't that bad. He's sixteen. If he can get his teeth into it and swallow, he's happy.

One of the twins wanted to gift some to the milkman when he came by. I nearly tackled him as he tried to walk out of the kitchen with them.

They really were that bad. I Googled "How to Make Baking Powder". Here's the CORRECT way to do it:
1 teaspoon baking soda
2 teaspoons cream of tartar
Mix well and use
Makes 1 tablespoon of baking powder.
Now I know. ;^)

Thursday, November 25, 2010

Pumpkin Invasion

I'm multi-tasking again...as usual. With internet slightly faster than Morse Code, I try to have several things going on at once, so that I don't get too frustrated with the fact that this really neat blog I want to read still hasn't finished loading.

Right now I have four sites loading, I'm baking a pumpkin pie, simmering chili, unloading photos from my camera and writing a blog post. Not bad for a Thursday afternoon!

So, the timer on my pie beeped. I looked over to see who was in the kitchen so they could slap the thing to silence it and noticed that I have a lot of pumpkin on my counter. Pumpkin in various stages. I had to take a photo. Yes, I'm a camera addict.
In the far back, on the left over there, is the last of my super-cheap-what-a-deal pumpkins waiting its turn in the oven. On the right is the next-to-last pumpkin, which just came out of the oven as the last two pumpkin pies went in. Right in front, sitting on my trusty-rusty deep freeze, are the first of the pies to come out. They are the reason my stomach is rumbling right now...just a sec. I'll take a picture...

Isn't it purty?!

So, while I sit on my duff and wait for timers to beep and pages to load, my faithful slave, er, I mean daughter is busily doing my job...

The chili is now ready to serve and the first cooked pumpkin looks like this...


So...I'm thankful.

Thought I'd forgotten, didn't you?! I'm only mostly out of touch. I do manage to remember things like Daylight Savings Time, Thanksgiving and Fourth of July. Thank you, Facebook!

Thank you, Lord, for another beautiful day.

Thank you, Lord,
for my family.

Thank you, Lord,
for my amazing husband who, amazingly enough, has put up with me for nearly 19 years and still loves me dearly!

Thank you, Lord,
that all of my children have put You first in their lives and that I'll be seeing them forever in heaven -- even if they move to Europe in this life. For instance. Not that any of them would ever do that. Right? Sarah?

Thank you, Lord,
for all our friends and adopted family here in Mexico. For Chuy, who stopped in for a glass of water and ended up hanging out all morning and staying for lunch (which is pretty normal for us!) and is now learning all about the Thanksgiving tradition of "pay de calabaza de holowin" (that would be "pumpkin pie").

Give thanks to the Lord for He is good...para siempre es su misericordia...His mercy endures forever!!!!

Tuesday, November 09, 2010

Tackle it Tuesday -- Butter is Better

The cows have come home for the winter and we once again are getting fresh milk every morning. Caleb and Jessee took off at 5:30 a.m. to go help milk our friend Ramon's cows, so I figured I should get busy skimming off the cream from yesterday's milk.

That done, my cream jar (a one-liter yogurt container) was now full. Time to make butter.Tackle it Tuesday!

I do hate to buy butter. First of all, it's expensive...and I'm a cheapskate.

Secondly, I can't buy unsalted butter here. It's not that I don't like salt in my butter -- oh no! I like salt. A lot. There's some conspiracy, though, about iodized salt here. It's all they have. Even the butter "sin sal" has flouridated (is that a word?) salt in it. I don't know about you, but I have issues with flouride. When we were little, didn't the dentist always tell us to make sure we didn't swallow the flouride? So, why are they putting it in our salt?

Anyway, enough of that soapbox. On to the task at hand...

Pictures being worth as much as they are, I've included a ton. This is a SUPER EASY process -- made easier if you own a Kitchenaid, but very doable even if you only have a hand mixer.

I start with raw milk, strain it, add a tablespoon or 2 of peroxide and let it set for a day in the fridge so the cream will come to the top. Skim off the cream, store it in a "cream jar" in the fridge. You'll need about 4 cups of cream to make about 1 1/2 cups of butter.

Ready? Let's do it. Start to finish, this took me an hour with no kids (or husband) underfoot. You can stop in the middle, so don't worry if you don't have an uninterrupted hour. (Who has an uninterrupted hour during daylight hours?)

Put the cream in the mixer bowl and add a bit of PLAIN salt (imported from the States). Today I put in about 1/8 tsp. I'd rather have it a bit bland than overdo the salt. Attach your wire whisk and turn on the mixer. I bring my Kitchenaid up to power level 6. At this point, you can watch if you want to, but it's going to be a while, so you might want to go do something else...like write a blog post.

After a few minutes, your cream will start to expand...keep whipping!

At about 7 minutes, you'll have a wonderful, fluffy whipped cream. Keep whipping!
At about 10 minutes, the cream will start to reduce and get thicker. You're getting closer. Keep whipping!
At this point, as clumps begin to form, the liquid may splash a bit.
Why on earth did Blogger rotate this photo? No idea.Here's my solution...
Keep whipping, you're almost there!!!

When the lumps separate, turn off your mixer and get out your trusty wooden spoon.


Push all the lumps together into one ball and then strain off the buttermilk.

WARNING!: This Photo Was Posed!!! Don't try to pour the buttermilk off with one hand while balancing the strainer over a Mason jar and taking a picture with the other hand. Using two hands I still managed to make a mess.


Put your lump of butter back in your mixer bowl, grab your wooden spoon again and let's smoosh. Smoosh out all the excess buttermilk by pressing the butter against the side of the bowl and then pour it off. Pour yourself a glass of drinking water.
Pour about a half a cup or so of water over the butter and repeat the smooshing process. Dump off the expressed water. Then do that again.
And again.
The goal here is to remove all the excess buttermilk which has been trapped in air pockets inside the butter. That residue will cause the butter to spoil over time. Of course, in our family the butter doesn't last that long, so I'm not overly picky. Two rinses is usually enough for me. If I'm planning to freeze it for later use, though, I'm a little more careful.Your butter is now finished. Press it into a bowl or container lined with plastic wrap -- or a butter crock, if you happen to have one -- and stick it in the fridge.
Honey's comment this morning, "Hey! The butter doesn't have that weird aftertaste today. What's different?"

My answer: It's homemade.