
That done, my cream jar (a one-liter yogurt container) was now full. Time to make butter.
I do hate to buy butter. First of all, it's expensive...and I'm a cheapskate.
Secondly, I can't buy unsalted butter here. It's not that I don't like salt in my butter -- oh no! I like salt. A lot. There's some conspiracy, though, about iodized salt here. It's all they have. Even the butter "sin sal" has flouridated (is that a word?) salt in it. I don't know about you, but I have issues with flouride. When we were little, didn't the dentist always tell us to make sure we didn't swallow the flouride? So, why are they putting it in our salt?
Anyway, enough of that soapbox. On to the task at hand...
Pictures being worth as much as they are, I've included a ton. This is a SUPER EASY process -- made easier if you own a Kitchenaid, but very doable even if you only have a hand mixer.
I start with raw milk, strain it, add a tablespoon or 2 of peroxide and let it set for a day in the fridge so the cream will come to the top. Skim off the cream, store it in a "cream jar" in the fridge. You'll need about 4 cups of cream to make about 1 1/2 cups of butter.
Ready? Let's do it. Start to finish, this took me an hour with no kids (or husband) underfoot. You can stop in the middle, so don't worry if you don't have an uninterrupted hour. (Who has an uninterrupted hour during daylight hours?)
Put the cream in the mixer bowl and add a bit of PLAIN salt (imported from the States). Today I put in about 1/8 tsp. I'd rather have it a bit bland than overdo the salt. Attach your wire whisk and turn on the mixer. I bring my Kitchenaid up to power level 6. At this point, you can watch if you want to, but it's going to be a while, so you might want to go do something else...like write a blog post.
After a few minutes, your cream will start to expand...keep whipping!
At about 7 minutes, you'll have a wonderful, fluffy whipped cream. Keep whipping!
 At about 10 minutes, the cream will start to reduce and get thicker. You're getting closer. Keep whipping!
 At this point, as clumps begin to form, the liquid may splash a bit.
 Here's my solution...
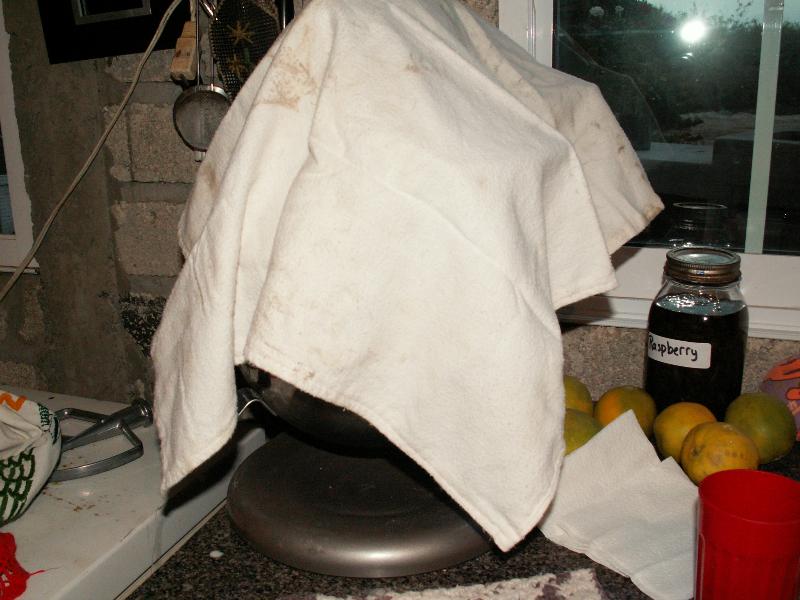 Keep whipping, you're almost there!!!
When the lumps separate, turn off your mixer and get out your trusty wooden spoon.

Push all the lumps together into one ball and then strain off the buttermilk.

WARNING!: This Photo Was Posed!!! Don't try to pour the buttermilk off with one hand while balancing the strainer over a Mason jar and taking a picture with the other hand. Using two hands I still managed to make a mess.

 Put your lump of butter back in your mixer bowl, grab your wooden spoon again and let's smoosh. Smoosh out all the excess buttermilk by pressing the butter against the side of the bowl and then pour it off. Pour yourself a glass of drinking water.
 Pour about a half a cup or so of water over the butter and repeat the smooshing process. Dump off the expressed water. Then do that again.
 And again.
The goal here is to remove all the excess buttermilk which has been trapped in air pockets inside the butter. That residue will cause the butter to spoil over time. Of course, in our family the butter doesn't last that long, so I'm not overly picky. Two rinses is usually enough for me. If I'm planning to freeze it for later use, though, I'm a little more careful.
 Your butter is now finished. Press it into a bowl or container lined with plastic wrap -- or a butter crock, if you happen to have one -- and stick it in the fridge.
 Honey's comment this morning, "Hey! The butter doesn't have that weird aftertaste today. What's different?"
 My answer: It's homemade.

2 comments:
Wow...so cool! I never thought of making my own butter. Thanks for sharing the process. Just FYI...there is a lot of controversy over Fluoride but it is not bad for you...if you ingest too much it can give you a tummy ache but then just drink some milk or take a tums with calcium and the calcium will bind with the fluoride and ease your stomach ache. The other thing that Fluoride does is strengthen your teeth...it does have some benefit by applying it directly on the teeth but if you were to ingest it while you were a kid (and your teeth were forming) then it is actually incorporated in the development process of the teeth and they are stronger because of it. Another reason it can be somewhat bad is if you were to ingest (i.e. swallowing toothpaste with fluoride) too much as a child then your teeth may have fluorosis which basically makes your teeth very strong but they often aren't very esthetically pleasing. I am a Dental Hygienist so I just wanted to share with you so you can make your decisions based on correct information.
I found you on SITS from the Goose Tribe!
http://spottedsmiles.blogspot.com
That is awesome! I never knew you could do it in a kitchen aid. As soon as I find me some raw milk, I am definitely giving this a try!
Post a Comment